Although Outlook is known for being the #1 email software program available, I find that its other features tend to be forgotten. One such function is the Outlook Calendar.
I would personally be lost without it, as I use my Outlook Calendar for EVERYTHING! From actual appointments I need to attend, to meetings, to reminders of what I need to do on specific days, to showing whose birthday it is next week and what I’m doing next weekend. It doesn’t matter if the task is a physical event or just something that I need to remember to do. It all goes into my calendar.
So let us explore some great features you can utilise to help improve your time management and scheduling with the Outlook Calendar.
Table of Contents
Categories will brighten your day
I love colour! I am a visual person and would much rather look at information as a visual representation than have to look at text.
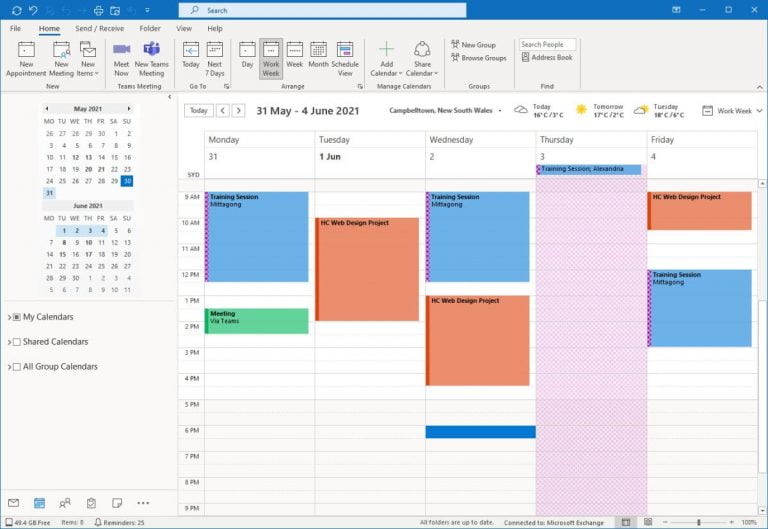
My calendar is bright. I use colours via Categories on almost every appointment or meeting shown in my calendar. The colour instantly tells me what the appointment is. It identifies if I’m busy in my office or busy offsite. It tells me if a training session is face to face (blue), or an online course/meeting (green). It tells me when my next website design task (orange) is booked for. I don’t have to read the information to identify what type of appointment or meeting it is.
We cover the use of Categories in the following courses:
Outlook Calendar Shortcuts
Keyboard shortcuts make my day more efficient and help my workflow throughout the day. There are lots of great shortcuts you can use in Microsoft Outlook, which you can download via my training blog.
There are also specific shortcuts you can use when working in the Outlook calendar. Some great ones include:
- Ctrl + T (take you back to Today)
- Ctrl + N (create a new appointment)
- Ctrl + Alt + 1 (switch to Day view)
- Ctrl + Alt + 2 (switch to Work Week view)
- Ctrl + Alt + 3 (switch to Week view)
- Ctrl + Alt + 4 (switch to Monthview)
- Ctrl + G (open an appointment or meeting first then use shortcut to apply recurrence)
Show Free/Busy time accurately
The calendar allows you to specify each appointment and meeting with a specific Show as setting.
The Show As options include:
- Free
- Working Elsewhere
- Tentative
- Busy
- Out of Office
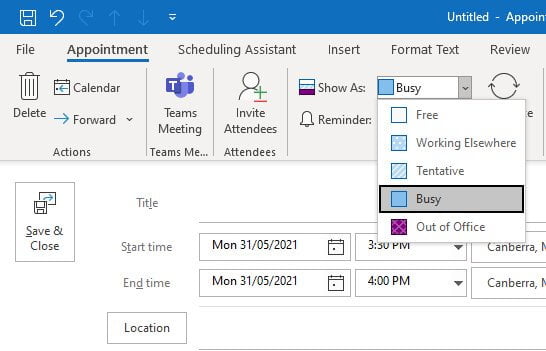
Having these set properly in your calendar will allow other users who may be scheduling a meeting with you via the Scheduling Assistant in Outlook or Microsoft Teams, to see your calendar correctly. If you are out of the office then it will show those appointments in a different colour. This can help colleagues to identify a better time that may suit your schedule especially if you are out of the office.
We cover how to use the Show As feature in the following courses:
Customise default appointment or meeting length
By default, Outlook sets all meetings and appointment durations to 30 minute blocks. If you tend to use a different time period for the majority of your scheduling, you can change Outlook to reflect this.
To edit the default duration for new appointments and meetings:
- Open Outlook
- Go to the File tab and choose Options
- Select Calendar from the sidebar
- Locate the Default duration for new appointments and meetings option and change the setting as needed
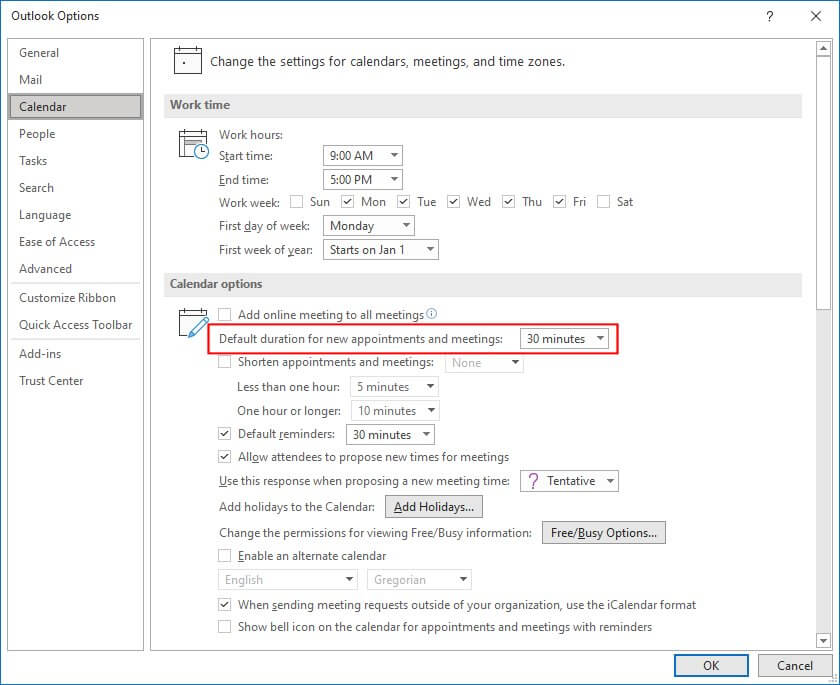
- Click OK to return to Outlook and see the new appointment durations
We cover how to customise the Calendar settings in the following courses:
View multiple Outlook calendars side-by-side or blended
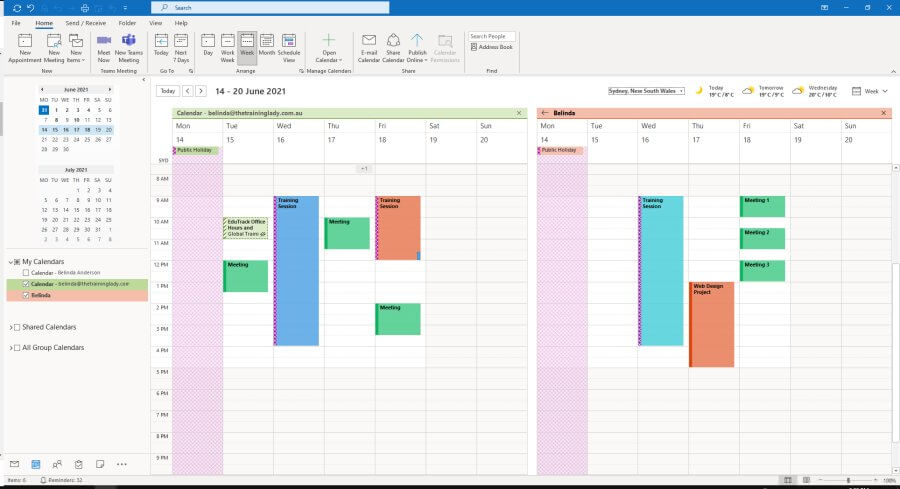
If you have access to multiple calendars you can choose to display those calendars either side-by-side or blend them together in a merged view.
This improves the way you are viewing calendars and is very handy if you are accessing other colleagues calendars.
To view calendars side-by-side
This one is super easy. Simply tick the box for the calendars you want to view side by side.
To view calendars blended together
If you’d like to view multiple calendars however have them overlap and blend appointments and meetings into one view, this is the option for you.
- Go ahead and view the calendars in side-by-side mode as shown in the previous section
- This time press the View in Overlay Mode button which is located to the left side of the second calendar name
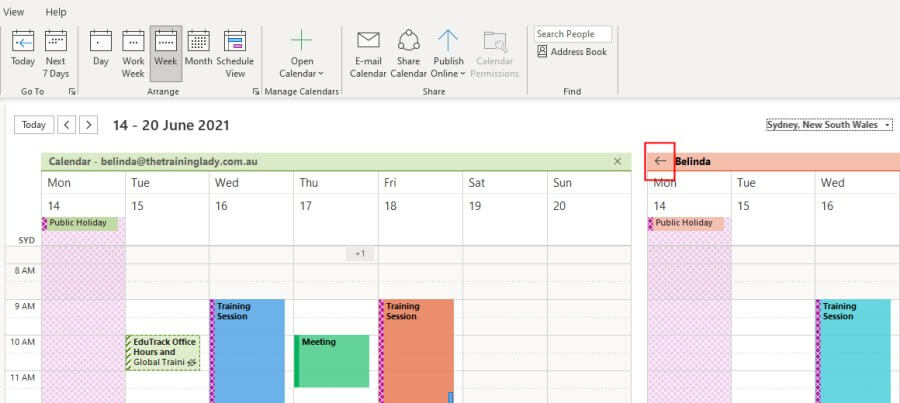
- You’ll now see both calendars overlaying each other
We cover how to view multiple calendars in the following courses:
Create a meeting or appointment from an email
If you receive an email from a colleague or client, did you know you can quickly create an appointment or meeting in your calendar complete with all the information included in the email message? This one never fails to get some smiles during training.
- Go to your Inbox
- Locate an email you’d like to create an appointment or meeting from
- Click and drag the email from the inbox and drop it onto the Calendar icon in the Navigation Pane
We cover how to create an appointment directly from the Inbox in the following courses:
Set start date using natural language
Let us pretend that we want to schedule an appointment or meeting to occur in 8 weeks. Generally we create the new appointment or meeting, click into the Start time field and use the calendar drop-down to count forward 8 weeks and choose the date.
Instead of manually counting forward, we can get Outlook to go and pick the date in the future using natural language such as “in 8 weeks” or “the second Wednesday in July”.
- Make sure you are in your Calendar
- Press Ctrl + N to create a new appointment
- Add a Title and any other relevant information
- Click in the Start time field to highlight the existing date
- Type over the date with your request e.g. “the first Monday in August” and press Enter on the keyboard
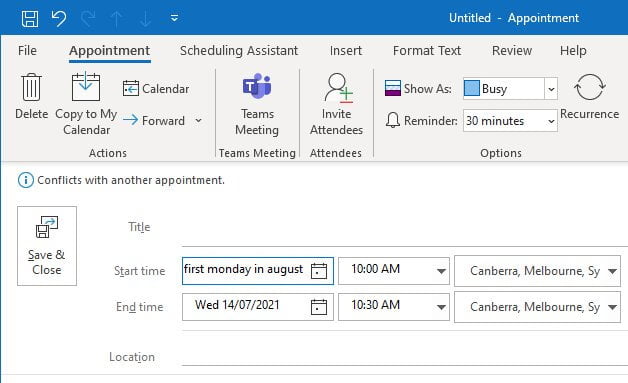
- Outlook will go and pick the date for you as per your request
- Save & Close the appointment window
We cover how to use natural language in the Calendar in the following courses:
Attach meeting information
When you create a new meeting in your calendar, be sure to attach any related information such as an agenda, participant details, questions or comments.
Once you create the meeting, select the Insert tab and use the Outlook Item option to include items from your Inbox as an attachment.
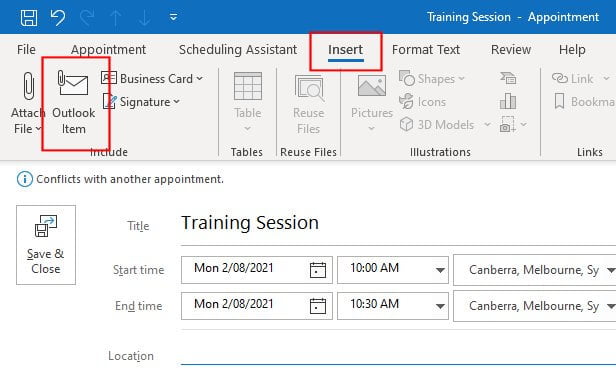
We cover how to attach meeting information in the following courses:
How to share your Outlook Calendar
This is a really common question I receive in training sessions. Often users want to be able to share their calendar with other staff members to allow them to make appointments or book meetings on their behalf and have those appear in their calendar automatically.
Or maybe you just want to allow someone to be able to read your calendar but not be able to create or edit any of your appointments.
If someone does have access to your calendar, you can still mark appointments as private so they cannot see private information where inappropriate.
Outlook Calendar Permissions
You can easily edit the permissions assigned to your calendar directly via Outlook.
Right mouse click on your Calendar and choose Sharing Permissions. You will be able to see who has access to your calendar now, or add anyone in you want to be able to access. You can choose between several permission options for users.
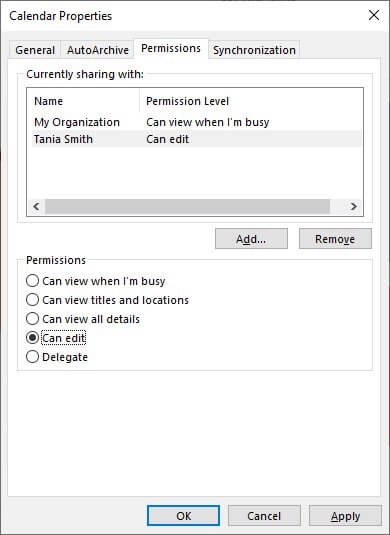
We cover how to share access to your Calendar in the following courses:
Install Outlook 365 to your phone
Many users have email set up on their smartphones which is great. BUT, a lot of the time the default Mail app is being used on Apple devices or Email app for Android. This means you aren’t experiencing the full Outlook 365 experience – E.g. You’re Missing Out!
Make sure that you download and install the Outlook 365 app for your smartphone.
Not only will you still have access to your email, but also direct access to your Outlook Calendar at the press of a button.
You’ll receive appointment reminders and can easily see what you have coming up next or tomorrow.
That's all folks
I hope you’ve found some of these tips help to improve your time management using the Outlook calendar. Be sure to check out our other blog posts for more useful tips and tricks.
Interested in extending your skills? We run face to face and online Outlook courses, click below for more information.

